Visit us on Hyena Cart

Showing posts with label DIY. Show all posts

Monday, February 18, 2013

Meal Planner

Do you (some of you I'm sure, do) know how much I hate asking, "What sounds good for dinner?"?!  I HATE it! I love cooking and baking, but I do not always like being the one to come up with what we eat.  I mean....sometimes, can't a girl get a little help?
  
You know what you need to do?  Make a menu board and get everyone to pitch in with what they want....makes life a breeze!
Yesterday, I decided the menu board I made last spring* has been hanging out behind the couch for far too long! In fact, it's been there since we moved here in August (that's a tad embarrassing!)
I told Ze-Ra to go grab a piece of lined paper, number it 1-30, but a Z next to lines 1-7 and a D next to lines 8-16.  She was then told to write in what she wanted for dinner in the next month on lines 1-7, she got so into it, she even came up with a list of side dishes she wanted so she made a second list on the back.  Wolverine then filled in his lines, 8-16.  I then filled in the rest with what I wanted, a few left over nights, and a few "adventure" nights for new dishes.

Now, all I had to do was find all of the selected foods on the cards I made last spring - but there have been some new additions to our menu since then, so I used some blank ones, and some backs of other cards.  I got all 30 main dishes set out and set to laying them out on the calendar.
Then I went through the side dish cards and paired them up with a coordinating main dish.
All in all, it probably took me about 30-45 minutes start to finish, but I also went through and organized all the unused cards (because I have a sickness). :)

Now....I can plan my grocery list out and always have what I have on hand.  I NEVER have to say, what do you want to eat?!  I know we usually end up moving a few things around and there might be some food that gets bumped to next month due to a large amount of something in the reclaimed produce boxes, something coming up, or just a massive craving, but it feels so liberating!!! :)

Do you plan your meals in advance?  What system do you use?

*Here's how I made mine:

How to Make Your Own Menu Board 

Step 1:  I took a piece of plywood we had laying around the house, covered it with quilt batting and stapled around the edges.
Step 2:  I then covered the batting with a fabric scrap and stapled that on as well.
Step 3:  Using ribbon, I divided the board into a "calendar".
Step 4:  I then also used ribbon to make a loop for hanging it and three loops for hanging the food cards.
Step 5:  I used scrapbook paper cut into squares for the cards and I just punched a hole in the corner to then thread them onto a binder ring.
Step 6:  I used mini clothes pins from Hobby Lobby to make sure the cards don't slip from behind the ribbon.

I thought I'd include a picture of the back so you could see what it looked like in case you were curious.

Tuesday, January 8, 2013

Montessori Button Snake

I saw these on pinterest forever ago and I've been making them for about a year now I guess.  They are super simple and super cute!

The idea is that kids can practice their buttoning skills on something other than their pants or shirts (really it is unfortunate how infrequently most kids wear button down shirts these days).  I was also thinking you could make different color games out of them, different hues of the same color, teach the rainbow, etc.

I have made a few of these, and a few snap-a-zoos as well, and I'm going to be sending some to my cousin who is a physical therapist - I was thinking that it might be fun and different for the little ones that they help.

Montessori Button Snake

What's In It:
Felt
Ribbon
Button
Thread/Needle

What To Do With It:
Cut your felt into squares of any shape you desire.  I went with 1 1/2" squares, but I think some shamrocks, hearts, stars, pumpkins, etc would be awesome! 

Fold each piece of felt in half and snip a slit in the center of each piece of felt.  No specific size, just make sure the ribbon can easily fit through.

Cut ribbon to desired length.  I find that including the snake tale, about 10" is good.

Sew a button onto one end of the ribbon.

Thread felt on the ribbon.

Sew the last piece of felt to the ribbon in a coordinating thread color. Alternately, you could sew a second button on instead.  

Saturday, January 5, 2013

Homemade Laundry Detergent

Looking for ways to save a little more money this year?  Well, how about switching to homemade laundry detergent?  It's super quick and simple and it's sure to save you some major $$$ over the course of the year.  

I've been using homemade detergent for over a year now and LOVE it!  I've made liquid and powder.  Both work really well, but who needs more than 5 gallons of detergent sitting around at once?!  I find this smaller batch of the powder to be more than enough.  It takes less than 10 minutes to make and lasts for over a month - and we do a LOT of laundry!  I was able to find all of the ingredients at ACE hardware or my other local Hardware stores - sometimes the larger "box" stores don't carry the washing soda...if they don't that's just one more reason to go support the smaller businesses. :) 


Homemade Laundry Detergent

What's In It:
1 bar Zote Soap or Fels Naptha Soap
1 1/3 c Washing Soda
1 1/3 c Borax
1/3 c Baking Soda

What To Do With It:
Shred soap using a cheese grater or just chop it up into chunks.  Put soap into a food processor or blender to turn the soap into coarse crumbs.  Combine remaining ingredients - I just shake everything together.  Be sure to give the container a quick shake before each use.

I have an HE front loading machine and I throw in about a tablespoon and half into each load of laundry.  I don't have any issues with stains, etc. and we are play in the dirt, wear our food, type of folk here at the Hive. :)

**Note, this detergent is not for cloth diapers.  Please use this recipe for cd's. 

Here are a few pictures to help illustrate the steps:
This is what your shredded soap will look like (for this batch I used Zote soap)

This is what the soap will look like after it's been run through the food processor

This is the finished product.  

Wednesday, December 19, 2012

Foaming Hand Soap

You know how a certain company (or two) makes the foaming hand soap?  I don't know about you, but I LOVE that stuff! I love seeing the bubbles and I know it is 100% in my head, but I feel like it gets my hands cleaner.  :)
But WOW that stuff is expensive!  I mean I can get a 3 pack at Sam's for $7, but with as often as people wash their hands in this house, that goes quick!  Also, I constantly worry about all the chemicals that are assaulting my family, particularly the little members, and if you look at the ingredient list, it is a little scary.   So, what do I do?
Dr. Bronners! I LOVE this stuff!  I bought a liter of it a month and a half ago for $15 and I use it for so many things and I have still only used about 1/3 of the bottle. :)

Homemade Foaming Hand Soap

What's In It:
1/2 T Dr. Bronners (use your favorite scent)
Water
Empty Foaming Soap Container

What To Do With It:
Fill soap dispenser with water (leave some head space for the pump to be reinserted).  Add soap.  Replace pump and shake.


Thursday, December 13, 2012

Stain Remover

I would like to take a moment and publicly apologize to my stain remover.  I shouldn't have doubted you.

I was in a flurry of making my own cleaners the other day because it seemed like at all once everything was down to the bottom of of the bottle.  No problem, I'll make up fresh of everything (in less than 15 minutes) and I'll take pictures to show all of you.  

Well, I'd never made stain remover before.  I've always just purchased it and with pets, kids, a garden, and lots of experimenting around here, that can get expensive - quick!  And besides the cost, who knows what kind of craziness is in there....and the fact that it was an aerosol made me die a little inside each time I used it.  I know they are supposed to be safe now with no fluorocarbons and what not, but I remember in grade school the huge campaigns to get everyone to stop using them....that stuff stuck with me I guess. 

So I do a little research and people seem pretty pleased with this blue dawn and hydrogen peroxide mixture. I have an extra spray bottle laying around - I think....I'll give it a whirl [Home Alone, anyone? :) ]

When I first mix it up it is blue.  I am thinking to myself, won't this just leave blue soap everywhere? So I test it out on a mud stain by the back door.  And yes, yes it does leave a blue soapy mess in the carpet.  I then proceed to "rinse" it out of the carpet with water.  :(
By this point, I have been working on my science experiment for far too long and it must come to an end.  It was time to take off my mad scientist coat and put on my mama hat.  Under the cabinet the stain remover goes and I'll deal with that later.

So later ends up being 2 days ago and Te-Man has decided to paint his clothing with dry erase markers.  The speed at which children can go from happily drawing to graffiti artist is startling.  

Almost an entire tide pen and 3 washes later, the orange marker just will not come out of his cute little swishy pants. :(  What do I do....certainly not give up - I'm on the Z-Squad! ;)  Ah Ha! The stain remover....let's give you a try.  I pull it out of the cabinet and it's clear?!?!?!  MAGIC ;)  

Well,  I don't know if it's magic, but it WORKED - his pants are marker free!  It has since worked just as well as the store bought garbage on the carpet and the couch (I told you we were messy).  

So maybe when the stain remover in your cabinet is empty, give this guy a shot.  Just be sure to spot check for color fastness - the hydrogen peroxide makes me a little nervous about maybe taking the color out of stuff.  

Homemade Stain Remover
What's In It:
1 Part Blue Dawn
2 Parts Hydrogen Peroxide

What To Do With It:
Mix together in a large spray bottle.  Wait until the solution turns clear to use.  

Friday, December 7, 2012

Homemade Window Cleaner

Do you love to have beautiful bathroom mirrors?  Have you ever noticed that the second you clean them, someone else from your family goes into your bathroom, covers their face in toothpaste foam, and shakes like a dog?  Oh....is that just at my house?  

Well, I guess it's a good thing my window and mirror cleaner is so cheap....less than $0.50 per bottle.  Shake away Z-Squad....Shake Away.  
We actually use this as an all purpose cleaner, counter tops, etc.  
Homemade Window Cleaner
What's In It:
1/4 c rubbing alcohol
1/4 c white vinegar
1 T cornstarch
2 c warm water

What To Do With It:
Combine in a large spray bottle.  Mix well.

Shake before use.  Thank me.  You're Welcome.  

:)  


Thursday, December 6, 2012

Homemade Cloth Diaper Detergent

Finding the right Cloth Diaper Detergent is a struggle.  I know, I've tried 5 different kinds.  Most regular detergents have chemicals that aren't safe for a baby's skin, particularly when wet and against their bottom for prolonged periods.  That means you're relegated to the cloth diaper detergents and they know they've got you.  Some cost you an arm and a leg, some leave a residue, some don't get the "stink" out, some aren't compatible with certain fabrics, and some might not be compatible with your baby's skin due to sensitivities.  Why does it have to be so difficult to not use disposable diapers?!

Well, now it isn't. :)

I found this recipe awhile back and I use it for my diapers now.  I'm loving it. :)

Homemade Cloth Diaper Detergent
What's In It:
1 c Baking Soda
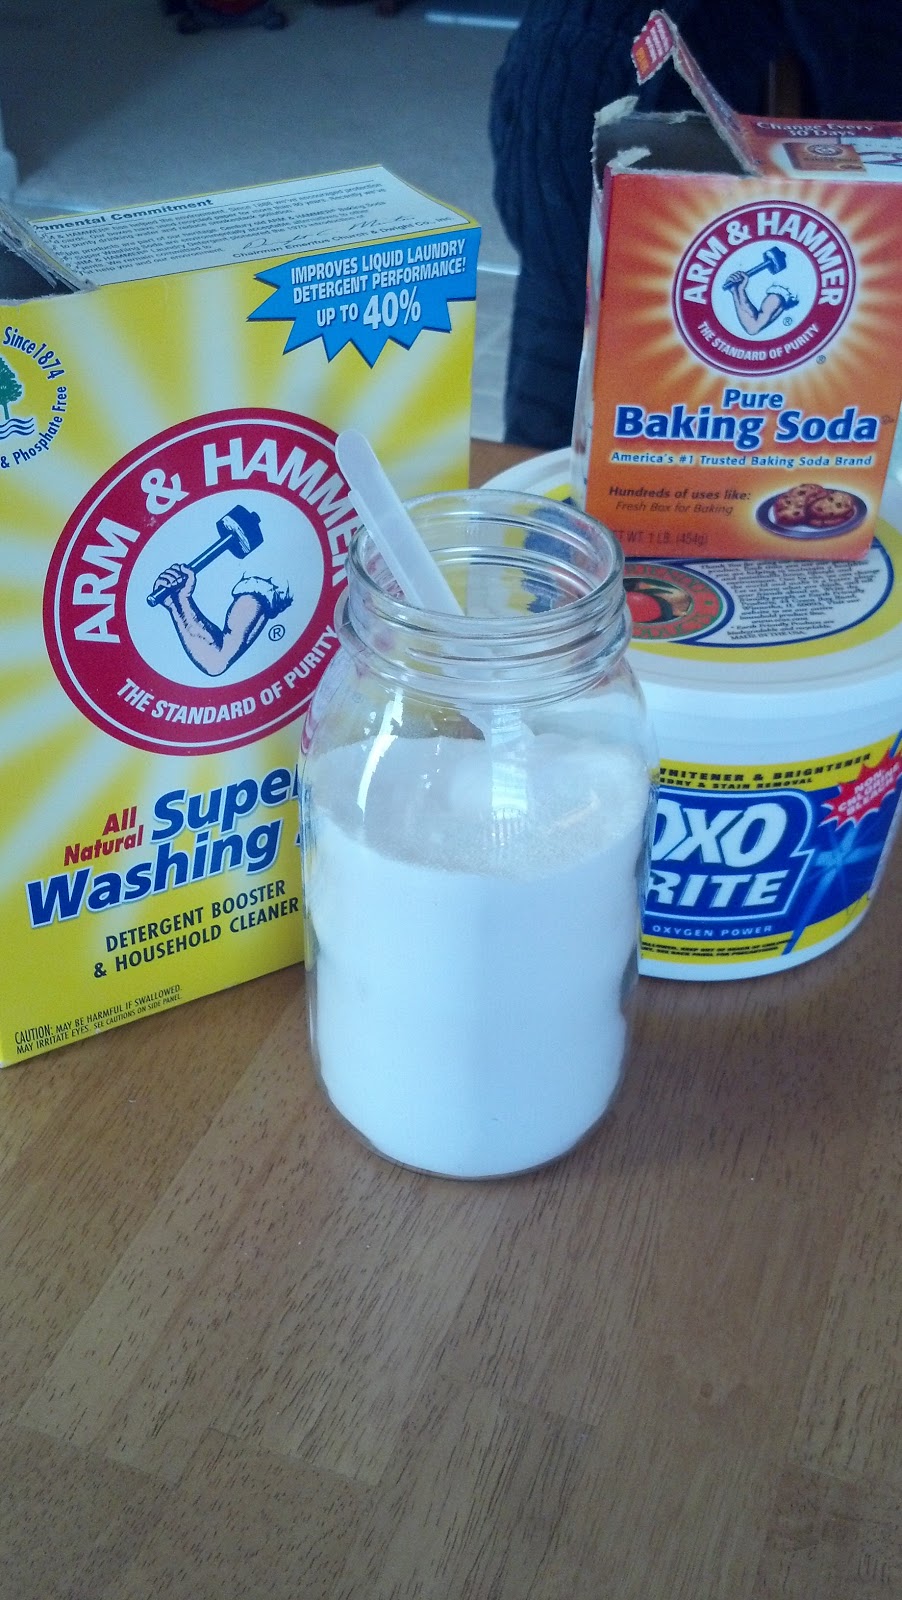
1 c Oxygen Cleaner
1 c Washing Soda 

What To Do With It:
Mix together in a quart sized mason jar (or any other container will do).  

Use approximately 1 T with each diaper load.  

I have found that if I use the scoop that comes in my oxo-brite, it's just slightly more than 1 T.  It works well for me (I always do an extra rinse after my heavy wash cycle just to make sure all of the soap is out of the diapers), but you're going to have to experiment with your own wash cycle and your little one's sensitivity.  

Good luck - I hope this recipe works as well for you as it has for me!  We also make our own regular laundry detergent - I'll get around to making another batch some day and I'll take some pics and post it up. :)

Do you make any of your own detergents?   


Wednesday, December 5, 2012

Homemade Baby Wipe Spray

Have I ever told you that I'm a tight wad?  I LOVE to save money...I'm not a coupon clipping crazy...but I totally would be if they gave out the kinds of coupons I need.  I don't really buy a lot of boxed goods and those that I do are usually organic or some such weirdness that there are never coupons for those...so I usually feel like searching for and finding coupons is more hassle than it's worth.  That doesn't stop me from saving money though!

Heck, just by cloth diapering Te-Man look at what we've saved:

Here is a chart I found on a diaper website and these numbers are for using the store brand diapers at Walmart, but that's not what we used when we had to use disposables (while we were figuring out where his rash was coming from), we were using Nature Baby Care Diapers which cost significantly more than Walmart Diapers.  I will use the numbers I found though, just because the point it proves, is staggering.
 Disposable Diapers

0-3 months
10-12 diapers/day
90 x 10 = 900
Size 1
$.17/diaper
$153.00
3-12 months
8-10 diapers/day
270 x 8 = 2160
Size 3
$.21/diaper
$453.60
12-30 months
7-8 diapers/day
540 x 7 = 3780
Size 5
$.25/diaper
$945.00
Total number of diapers
6840
Total Cost for Disposables
$1551.60


Add another $200.00 for disposable wipes for a total of $1751.60 for 30 months of disposable diapers and wipes. This is per child.

Also, think about the fact that those bad boys never truely biodegrade - almost 7000 diapers per baby born in the USA?!

Alright, but this isn't about environmental issues, this is about my wallet.  So, when Te-Man was still incubating, we purchased a cloth diaper package for $300.  I have since sold these diapers to another Cloth Diaper user because I got a crazy hair brained idea to make my own, but I wouldn't have needed to, the diapers would have been more than enough to last until Te-Man is potty-trained.

Also, I didn't want to buy wipes, so I took a bunch of old T-shirts and some clearance fleece from the fabric store, cut them into squares, and wipped up a bunch of wipes - all in all, cost me about $10.

So I spent $310 and disposable wearing babies spend a minimum of $1700!  And my diapers can be used on multiple children.  Think about a family that has 3 kids, I figure they'd probably purchase a few extra diapers because each kid needs a few new ones to "feel special" so a cloth diapering family would spend $400 and a disposable wearing family would spend $6800....WHAT?!

Did you survive the tangent?  Let's get back to the homemade spray....we all know baby wipes are wet....so what am I going to use for the solution....oh... I'll make my own.  ;)

Homemade Baby Wipe Spray

What's In It:
25oz Water
1 T Dr. Bronner's Soap*
1/4 c olive oil
1 lrg spray bottle

What To Do With It:
Add water to spray bottle - if it has a measured mark for 25oz that's great, if not, just add 3 cups of water.

Add in soap and olive oil.  

Give her a shake and you're all set.  

*Can also use 1/4 c baby soap

Tuesday, December 4, 2012

Homemade Bathroom Cleaner

Anyone that has ever seen Pinterest has seen this pin. You know the one I'm talking about, the "miracle" tub and shower cleaner. :)

Well, I've been using it for almost 2 years and I have to agree - it works great! When I found out I was pregnant with Te-Man I decided that I shouldn't be using anything that has chemicals in it....or at least as few as I could.  I wanted to really make some changes, but I didn't want to sacrifice too much on the "it actually works" front.  So, I tried a few things for tub/shower/toilet cleaner, and I liked this one the best.  I haven't purchased a bathroom cleaner in ages!

Homemade Bathroom Cleaner

Equal Parts Blue Dawn and White Vinegar

I use 1 cup of each.

I measure out my 1 c vinegar into a 2 c measuring cup.

Heat in the microwave for 1 minute, then pour in the dawn until the liquid level reaches 2 c.  

Pour (using a funnel if you want) into a spray bottle.  

I have found that combining them in the measuring cup means less dawn goes to waste and I don't have to get out a spatula to make a huge soapy mess. ;) 

I spray it on, let it sit for about 10 minutes, wipe it off using a kitchen sponge, and rinse with water.  **Honesty alert: Depending on how long it's been since I last cleaned the shower, I normally can use the soft side of a kitchen sponge....sometimes when I've been lazy, I need to use the scrubby side.  But either way, I can't say I have ever had to use any amount of elbow grease to get things cleaned up. :)  

Monday, November 12, 2012

Making Your Own Lotion

Let's see....long story short....we are a cloth diapering family.  But last year about the time Te-Man was 5 months old he started getting a weird rash every time he was in a cloth diaper and the only thing that would take care of it was using a non-cloth diaper safe creme with a disposable.  So for about 4 months, the rash would show up and then we'd throw a disposable on him to clear it up.  The rash would show up and be gone within an hour.  Countless trips to the dr, phone calls with the cloth diaper manufacturer we were using, endless tinkering with the washing routine, and 9 different diaper ointments - one of which I made.  Well, turns out he just has a wetness sensitivity and we threw a moisture barrier/stay dry fabric on top of the cloth diaper soaker and BAM problem solved!

WHEW!

But...now I have a cabinet full of lotion ingredients - you didn't think they were just going to sit there did you? ;)
There are a million lotion recipes out there and the truth is, you're going to have to just start playing with them to figure out what texture, viscosity, scent, etc that you like.  Here is where I got the basic "recipe" that I used.  I didn't have beeswax and didn't feel like waiting to order some, so I skipped it and just added in the cocoa butter instead.  I'm sure the end result is a bit less of a creme and more of a lotion, but I'm ok with that.  
Homemade Lotion*
What's In It:
1/2 c olive oil
1/4 c coconut oil
1/4 c cocoa butter
1/4 c shea butter
Essential Oils: Lavender, Vanilla Extract

What To Do With It:
Fill a saucepan with a few inches of water and heat over medium heat.
Combine all ingredients, except essential oils, in a pint size (or larger) jar.  Remember, you're going to have to be able to reach in and get the lotion out, so keep that in mind while choosing.

Loosely cover the jar and place into the water bath.  Be sure there is not so much water in the pan that it causes your lotion jar to tip.
As the oils and butters warm in the water bath, they will start to melt.  Gently swirl to combine.

Once they are completely melted, add in the oils of your choice.  (I chose Lavender and Vanilla Extract.  I think it is impossible to count the drops, but I used about 2 good shakes of each.)  Swirl to combine.
Allow the lotion to cool completely.  This might take 8+ hours...I usually put mine on a trivet in the garage so I stop checking it. ;)

Use as you would any lotion.  Discard if lotion starts to appear degraded in any way.

*I have not done any shelf life or efficacy studies on this product.  Use at your own risk.


Friday, November 9, 2012

Homemade Facial Astringent

Did you know that you can make your own facial astringent?  It's a lot cheaper than from the store, you can control the scent, and it doesn't have alcohol that could dry your skin (it doesn't have any of those other weird chemical ingredients either!).

Facial Astringent
What's In It:
2 T Witch-hazel
6 T Rose Water
6 T Water
Essential Oils*

What To Do With It:
Combine witch-hazel and waters into a lidded container (I used an old sea breeze bottle).    Add whatever scents you would like, start with just a few drops - you can always add more if you want.  

Enjoy!  We've been using this for about 2 months and just use a cotton ball to apply.  Wolverine especially likes to use it after he shaves - it's always crazy (gross) to see all of the stuff that would have sat on his face all day! 
*For a more sea breeze like smell, use eucalyptus oil.  

I have not done any shelf life or efficacy studies on this product and I am not claiming that it can do the same things as sea breeze or any other store bought facial toner or astringent.